How to Transfer Photos from Canon Digital Camera to Computer: Complete Guide
Transferring photos from your Canon digital camera to your computer can seem daunting at first, but it doesn’t have to be complicated. Whether you’re a professional photographer or just an enthusiast, learning this essential skill is key to effectively managing your photography workflow.
In this guide, we will walk you through easy and efficient methods to transfer your pictures from your Canon digital camera to both Windows and Mac computers. We’ll cover common issues, provide clear steps, and ensure you never struggle with this simple yet important process again.
Related: How to Organize Your Digital Photos Like a Pro
📌 Understanding the Basics of Transferring Photos
Before we dive into the actual steps, it’s helpful to understand the basics. There are primarily two methods:
-
Using a USB cable directly from your camera to the computer
-
Using an SD card reader
We’ll cover both methods comprehensively below.
✅ Method 1: Transfer Photos Using a USB Cable
This method is straightforward and preferred by most beginners.
Step-by-step Guide (Windows & Mac):
-
Connect Your Canon Camera via USB:
-
Switch off your camera.
-
Connect your camera to your computer using a compatible Canon USB cable.
-
Switch on your camera; it should automatically detect the computer.
-
-
Access Files on Windows:
-
Open File Explorer (Windows key + E).
-
Click This PC, locate your Canon camera under Devices and Drives.
-
Open the camera folder to locate the images.
-
-
Access Files on Mac:
-
Use the Image Capture app on Mac.
-
Select your Canon camera from the left pane.
-
Choose the destination folder and click “Import.”
-
-
Safely Disconnect Your Camera:
-
Always eject the camera safely before unplugging the USB cable to prevent data loss.
-
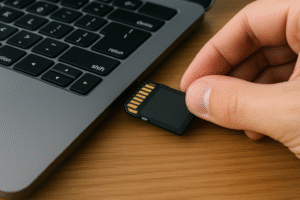
✅ Method 2: Transfer Photos Using SD Card Reader
If you prefer not to use a cable, an SD card reader is an excellent alternative.
Step-by-step Guide (Windows & Mac):
-
Remove SD Card from Canon Camera:
-
Safely power off the camera and remove the memory card carefully.
-
-
Insert SD Card into Computer or Card Reader:
-
Most laptops have built-in SD card slots; insert your SD card.
-
If not available, use an external USB SD card reader.
-
-
Transfer Photos on Windows:
-
Open File Explorer, find the SD card under Devices and Drives.
-
Open the “DCIM” folder, select your photos, then copy and paste to your desired location.
-
-
Transfer Photos on Mac:
-
SD card should automatically appear on the desktop.
-
Drag-and-drop files directly onto your desktop or desired folder.
-
📌 Common Issues and Troubleshooting Tips
Problem: Computer Doesn’t Detect Canon Camera?
Possible solutions:
-
Try a different USB port or cable.
-
Update Canon drivers via Canon’s official website.
-
Restart the computer or camera.
Problem: Slow Transfer Speeds?
Possible solutions:
-
Use USB 3.0 ports and cables.
-
Prefer SD card readers for large batches of photos.
✅ Additional Tools: Canon EOS Utility Software
Canon provides specialized software called EOS Utility, designed for seamless photo transfer and management.
Benefits of EOS Utility:
-
Automatic file transfers.
-
Remote camera control.
-
Compatible with both Windows and Mac.
Download from Canon’s official EOS Utility page.
📌 Essential Accessories for Easy Photo Transfer
-
Canon Compatible USB Cable: Ensures quick transfers without errors.
-
High-speed SD Cards: Faster read/write speeds for smooth photo transfers.
-
Reliable Card Readers: Anker, Sandisk, or Kingston readers for safe transfers.
✅ Tips to Organize Photos after Transfer
After successfully transferring your photos, organization is essential:
-
Use date-based or event-based folder naming.
-
Backup regularly (Google Drive, iCloud, external drives).
-
Delete unwanted or duplicate images immediately.
🔍 FAQ
Connect your camera via USB, open File Explorer (Windows) or Image Capture (Mac), and copy files to your computer.
Ensure your USB cable isn't faulty, the camera is powered on, and drivers are updated. Restart your devices.
Yes, remove the SD card and use an SD card reader to transfer images directly to your PC or Mac.
Use dedicated photo management software like Adobe Lightroom or EOS Utility to organize your collections effectively.
Canon typically uses USB Type-A to Mini-B or USB-C cables, depending on your camera model. Q1: How do I transfer photos from my Canon camera to my computer quickly?
Q2: Why is my Canon camera not showing up on my computer?
Q3: Can I transfer photos from my Canon camera without a cable?
Q4: What's the best way to manage transferred photos?
Q5: Which cable is used for Canon cameras to transfer photos?